


How to Import Datasets in Machine Learning Using Scikit-Learn: A Step-by-Step Guide
Supervised learning with scikit-learn (Part 6)

📚Chapter:3-Data Preprocessing and Pipelines
Discover how to import datasets in Python using Scikit-Learn in this comprehensive guide. Learn about built-in datasets, external data files, and synthetic data generation. Master data handling techniques to enhance your machine learning projects and achieve accurate predictions. Perfect for beginners and data enthusiasts!

If you want to read more articles about Supervise Learning with Sklearn, don’t forget to stay tuned :) click here.
Description
Machine learning is a rapidly growing field that enables computers to learn from data and make accurate predictions — all without the need for explicit programming. A critical step in any machine learning project is importing the dataset, which serves as the foundation for building and training models. Proper data handling is key to achieving successful results in machine learning.
In this blog, we’ll guide you through the process of importing datasets in Python using the widely-used Scikit-Learn library. Whether you’re working with built-in datasets or external data files, you’ll learn practical steps to streamline your workflow and set your machine learning projects up for success.
Sections
Understanding Scikit-Learn
What is a dataset
Why do you need datasets
Importing Scikit-Learn
Loading Sample Datasets
Loading External Datasets
Loading CSV Datasets
Handling Custom Datasets
Create Synthetic Data using Python
Section 1- Understanding Scikit-Learn
Scikit-Learn, also known as sklearn, is an open-source machine-learning library for Python. It provides simple and efficient tools for data analysis and modeling, including various machine learning algorithms. One of the strengths of Scikit-Learn is its consistent and user-friendly API, making it easy to implement machine learning workflows.
Section 2- What is a dataset?
A dataset in machine learning is a collection of instances (instance refers to a single row of data) that all share some common features and attributes. For a machine learning model to perform different actions, two kinds of datasets are required –[1]
Training Dataset — The data that is fed into the machine learning algorithm for training.
Test Dataset or Validation Dataset — The data that is used to evaluate and test that the machine learning model is interpreting accurately.
Section3-Why do you need datasets?
Machine learning algorithms learn from data. A machine learning algorithm identifies trends, and relationships, and makes predictions based on large volumes of data given to training the models. Thus, data is the golden goose in machine learning. The insights gleaned from machine learning models are only as good as the dataset. Having large and better training data for a machine learning project leads to better and more accurate model performance. Reliable machine-learning datasets are extremely important and play a vital role in the development of accurate machine-learning models.[1]
Section4- Importing Scikit-Learn
Before we dive into importing datasets, make sure you have Scikit-Learn installed. If not, you can install it using:
pip install scikit-learnNow, let’s explore the different ways to import datasets using Scikit-Learn.
Section5- Loading Sample Datasets
Scikit-Learn comes with several built-in datasets that are useful for practicing and testing machine learning algorithms. To load a sample dataset, you can use the following code:
Python
from sklearn import datasets
# Load the iris dataset
iris = datasets.load_iris()
 # Access the features and target variable
X = iris.data # Features
y = iris.target # Target variable
In this example, we loaded the famous Iris dataset, which contains measurements of 150 iris flowers from three different species. X represents the features (sepal length, sepal width, petal length, and petal width), and y represents the target variable (the species of iris).
Section 6- Loading External Datasets
Scikit-Learn also provides functions to load external datasets. For example, you can use the load_svmlight_file function to load datasets in the LIBSVM format:
from sklearn.datasets import load_svmlight_file
# Load a dataset in LIBSVM format
X, y = load_svmlight_file('path/to/dataset.txt')
Replace 'path/to/dataset.txt' with the actual path to your dataset file.
Section7- Loading CSV Datasets
For datasets in CSV format, you can use libraries like Pandas to load the data and then convert it to NumPy arrays for further processing with Scikit-Learn:
import pandas as pd
 # Load a CSV dataset using Pandas
 df = pd.read_csv('path/to/dataset.csv')
 # Convert the DataFrame to NumPy arrays
X = df.drop('target_column', axis=1).values
 # Features
y = df['target_column'].values
# Target variable
Replace 'path/to/dataset.csv' and 'target_column' with the appropriate values for your dataset.
Section8-Handling Custom Datasets
If you have a custom dataset, you can create NumPy arrays or Pandas DataFrames and then use them in your machine learning pipeline. Ensure that the features and target variable are correctly defined.
import numpy as np
# Create NumPy arrays for features and target variable
 X_custom = np.array([[feature1, feature2, ...], [feature1, feature2, ...], ...])
y_custom = np.array([target1, target2, ...])
Now that you have a basic understanding of importing datasets using Scikit-Learn, you can proceed with exploring and analyzing your data, preparing it for training machine learning models. Remember that the dataset’s quality and how well it represents the problem at hand greatly influence the success of a machine learning model. Proper data preprocessing, feature engineering, and understanding the domain are crucial aspects of any machine learning project.
Section-9- Loading Datasets from Google drive
import pandas as pd
from google.colab import drive
drive.mount('/content/drive')
Train_data = pd.read_csv('/content/drive/MyDrive/Datasets (1)/Student field Recommendation /Placement_Data_Full_Class.csv',encoding = 'latin')
Section -10- Loading Datasets from GitHub
!pip install wget
!rm markets.csv
!wget https://raw.githubusercontent.com/hussain0048/Projects-/master/stock_data.csv -O stock_data.csv
df = pd.read_csv("stock_data.csv", sep=",", header=0)
Section-11- Synthetic dataset
Definition
Companies often come across the problem where they don’t have enough real-life data or they cannot use actual data due to privacy concerns. This is where synthetic data generation comes to the rescue. Researchers and data scientists are using synthetic data to build new products, improve the performance of machine learning models, replace sensitive data, and save costs in acquiring the data. The synthetic data is used in the healthcare sector, self-driving cars, and financial sectors, maintaining a high level of privacy, and for research purposes [2]
Synthetic data is artificially annotated information that is generated by computer algorithms or simulations, commonly used as an alternative to real-world data [1]. Synthetic data is commonly used as an alternative to real-world data. More specifically, it is artificially annotated information that is generated by computer algorithms or simulations. Research has shown that synthetic data can be as good or even better than real-world data for data analysis and training AI models; and that it can be engineered to reduce biases in datasets and protect the privacy of any personal data that it’s trained on. With the right tools, synthetic data is also easy to generate, so it is considered a fast, cost-effective data augmentation technique, too [1].
Section 12- Create Synthetic Data using Python
1- Sklearn dataset
Wine dataset
from sklearn.datasets import load_wine

wine = load_wine()
for line in wine.DESCR.split("\n")[5:29]:
    print(line)
wine_df = pd.DataFrame(data=wine.data, columns = wine.feature_names)
wine_df["WineType"] = wine.target
wine_df.head()
Breast Cancer dataset
from sklearn.datasets import load_breast_cancer

breast_cancer = load_breast_cancer()
for line in breast_cancer.DESCR.split("\n")[5:31]:
    print(line)
breast_cancer_df = pd.DataFrame(data=breast_cancer.data, columns = breast_cancer.feature_names)
breast_cancer_df["TumorType"] = breast_cancer.target
breast_cancer_df.head()
Boston Housing datast
from sklearn.datasets import load_boston
boston = load_boston()
for line in boston.DESCR.split("\n")[5:29]:
    print(line)
boston_df = pd.DataFrame(data=boston.data, columns = boston.feature_names)
boston_df["Price"] = boston.target
boston_df.head()
Regression problem generation
from sklearn.datasets import make_regression
data1 = make_regression(n_samples=20, n_features=4, n_informative=2, n_targets=1,
                        bias=0.0, effective_rank=None,tail_strength=0.5,
                        noise=0.0, shuffle=True, coef=False, random_state=None)
df1 = pd.DataFrame(data1[0],columns=['x'+str(i) for i in range(1,5)])
df1['y'] = data1[1]
df1.head()

 x1 x2 x3 x4 y
0 0.838064 0.079599 -0.092742 1.254009 135.442681
1 0.568419 0.760923 -0.769933 -0.790223 -45.813264
2 0.692084 -0.493769 0.206512 0.550692 71.163141
3 0.607550 -1.449636 0.822219 1.995158 189.321754
4 0.200813 -1.737370 1.185276 -0.561152 -39.846264
Classification problem generation
from sklearn.datasets import make_classification
data3 = make_classification(n_samples=20, n_features=4, n_informative=4, n_redundant=0, n_repeated=0,
                            n_classes=2, n_clusters_per_class=1, weights=None, flip_y=0.01, class_sep=1.0,
                            hypercube=True, shift=0.0, scale=1.0, shuffle=True, random_state=None)
df3 = pd.DataFrame(data3[0],columns=['x'+str(i) for i in range(1,5)])
df3['y'] = data3[1]
df3.head()
Clustering problem generation
from sklearn.datasets import make_blobs
data4 = make_blobs(n_samples=60, n_features=4, centers=3, cluster_std=1.0,
                   center_box=(-5.0, 5.0), shuffle=True, random_state=None)
df4 = pd.DataFrame(data4[0],columns=['x'+str(i) for i in range(1,5)])
df4['y'] = data4[1]
2- Generate random dummy data
To generate random ‘dummy’ data, we can make use of the make_classification() function in case of classification data, and make_regression() function in case of regression data. This is very useful in some cases when debugging or when you want to try out certain things on a (small) random data set. Below, we generate 10 classification data points consisting of 4 features (found in X) and a class label (found in y), where the data points belong to either the negative class (0) or the positive class (1)[3]. make_classification is a pretty handy function to create some experimental data for you. The important parameter over here is weights which ensure 95% are from one class and 5% from the other class
from sklearn.datasets import make_classification
import pandas as pd
X, y = make_classification(n_samples=10, n_features=4, n_classes=2, random_state=123)
#Here, X consists of the 4 feature columns for the generated data points:
pd.DataFrame(X, columns=['Feature_1', 'Feature_2', 'Feature_3', 'Feature_4'])
#And y contains the corresponding label of each data point
pd.DataFrame(y, columns=['Label'])
from sklearn.datasets import make_classification
X, y = make_classification(n_classes=2, class_sep=0.5,
weights=[0.05, 0.95], n_informative=2, n_redundant=0, flip_y=0,
n_features=2, n_clusters_per_class=1, n_samples=1000, random_state=103- Create a dataset with SMOTE
from imblearn.over_sampling import SMOTE
sm = SMOTE(random_state=42)
X_res, y_res = sm.fit_resample(X_train, y_train)
4- Faker
We might come across a situation where we need to generate some test data or use some dummy data in our analysis. One way to get dummy data is by using the Faker library. This will generate fake data for you very quickly when you need to.Faker is a fantastic package to generate fake random data. Each time you use the faker library generator, it will result in different random data. There are numerous exciting methods like fake text, fake credit card numbers. The complete documentation of this faker library and its uses is at this link [4,3].
!pip install faker
from faker import Faker
fake = Faker()
# Generating fake email
print (fake.email())
# Generating fake country name
print(fake.country())
# Generating fake name
print(fake.name())
# Generating fake text
print(fake.text())
# Generating fake lat and lon
print(fake.latitude(), fake.longitude())
# Generating fake url
print(fake.url())
# Generating fake profile
print(fake.profile())
# Generating random number
print(fake.random_number())
from faker import Faker
fake = Faker()
print(fake.profile())
print(fake.credit_card_number())5-Seaborn Datasets
There is a nice variety in the datasets which allows for a variety of data science techniques. But first, let’s figure out how to find them and what they are [5].
# we need to import the seaborn package first
import seaborn as sb
# import pandas for data frame
import pandas as pd
# using seaborn, we can return a list of the data set names
sb.get_dataset_names()
Importing Seaborn is the first step, inside the package are all of our data sets. Next, we call the names of those data sets and it returns a list — that looks like this.

Anscombe
Anscombe’s quartet is comprised of four data sets that have nearly identical simple descriptive statistics — meaning that they all have eleven points and their averages and variance are all very similar. But they all have very different distributions and appear very different when graphed. They were constructed in 1973 by the statistician Francis Anscombe to demonstrate both the importance of graphing data before analyzing it and the effect of outliers and other influential observations on statistical properties. Both of these are important ideas to a good data scientist.[5].
# we can load the dataset directly onto a data frame
df = sb.load_dataset('anscombe')
# look at a portion to see what we are working with
df.head()
Suggested Projects
We can do a few things here:
Clustering — build an algorithm that can detect patterns in the data and see if there is any similarity between points in datasets I, II, III, and IV.
Logistic Regression — try and predict which point belongs to which data set
Linear Regression — try and predict the missing value of x or y
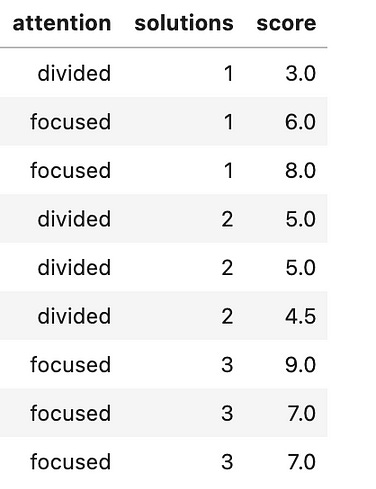
Attention
This data set is built upon test takers, whether they were focused, and what score they received. The data set looks like this:[5]
Suggested Projects:
Logistic Regression — we can try and predict whether the target variable is ‘focused’ or ‘distracted.’
Car Crashes
This data set is divided into different states in the U.S. Each state has the following features:[5]
Suggested Projects:
Logistic Regression — we can try and predict whether the target variable is ‘focused’ or ‘distracted.’
Car Crashes
This data set is divided into different states in the U.S. Each state has the following features:[5]

As you can see, the data set is flush with continuous variables. Ignoring the ‘abbrev’ feature which just tells us the state, we can use this data set to predict almost any feature.
Suggested Projects:
Multivariate Linear Regression — using the combination of features you can try to build a model that will predict any of the features.
Clustering — grouping states together based on the features. An interesting analysis idea would be to look at the clusters to try and determine group models using outside research (ie. traffic laws).
Diamonds
In this data set, each observation is a unique diamond. Features include carat, color, cut, clarity, and dimensions (x,y,z). This is a well-known beginner data set that can be used in a variety of projects.[5]

Suggested Projects:
Multivariate Linear Regression — there are a lot of continuous variables that could be predicted
Multivariate Logistic Regression — try to predict either color, cut, or clarity using the other features
Clustering — analyze clusters that come up and determine shared characteristics (ie. overpriced, fairly priced, etc
Section-13-Conclusion
Scikit-Learn provides convenient tools for importing datasets, whether they are built-in, external, or custom. Mastering this step is essential for a successful machine learning journey, as it sets the stage for subsequent data analysis, model training, and evaluation. Happy coding!
📌 Related Posts You Might Like
7–100+ Machine Learning Datasets Curated For You (Unread)
8-My cookbook for data creation (Unread)
5 Commonly Used Python Datasets (Unread)
🎯 Call to Action
Liked this tutorial?
👉 Subscribe to our newsletter for more Python + ML tutorials
👉 Follow our GitHub for code notebooks and projects
👉 Leave a comment below if you’d like a tutorial on vectorized backpropagation next!
👉, Supervised Learning with sklearn: Enroll for Full Course to find notes, repository etc.
👉, Deep learning and Neural network: Enroll for Full Course to find notes, repository etc.
🎁 Access exclusive Supervise Leanring with sklearn bundles and premium guides on our Gumroad store: From sentiment analysis notebooks to fine-tuning transformers—download, learn, and implement faster.